Projects
- SxS Mobile
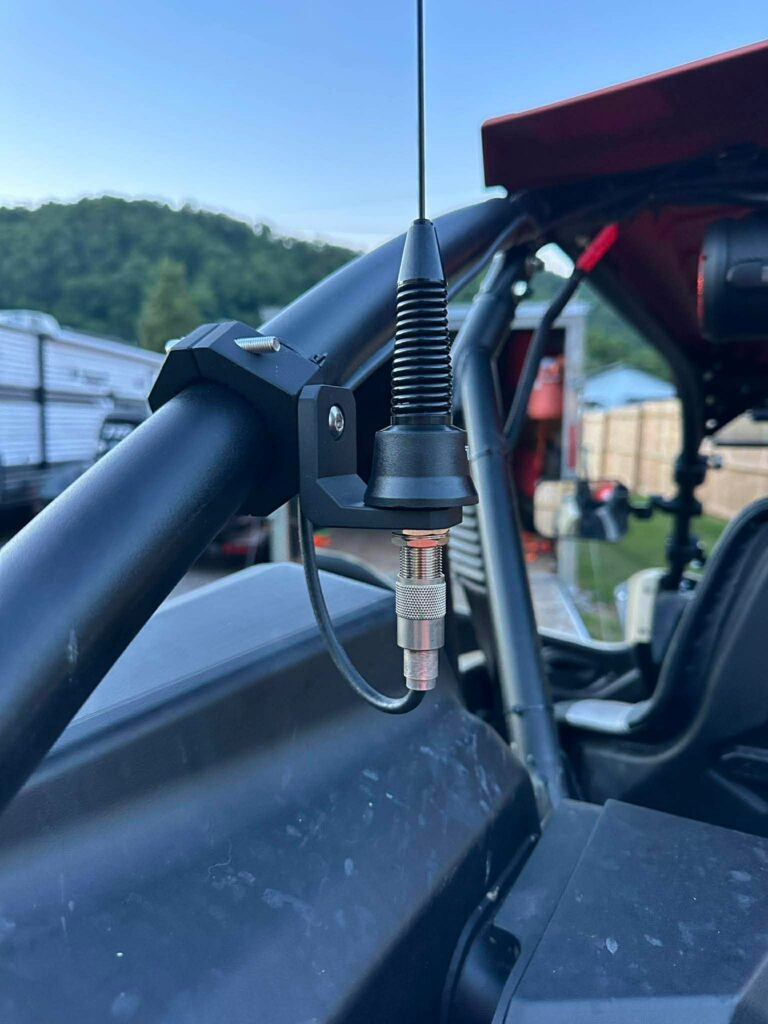
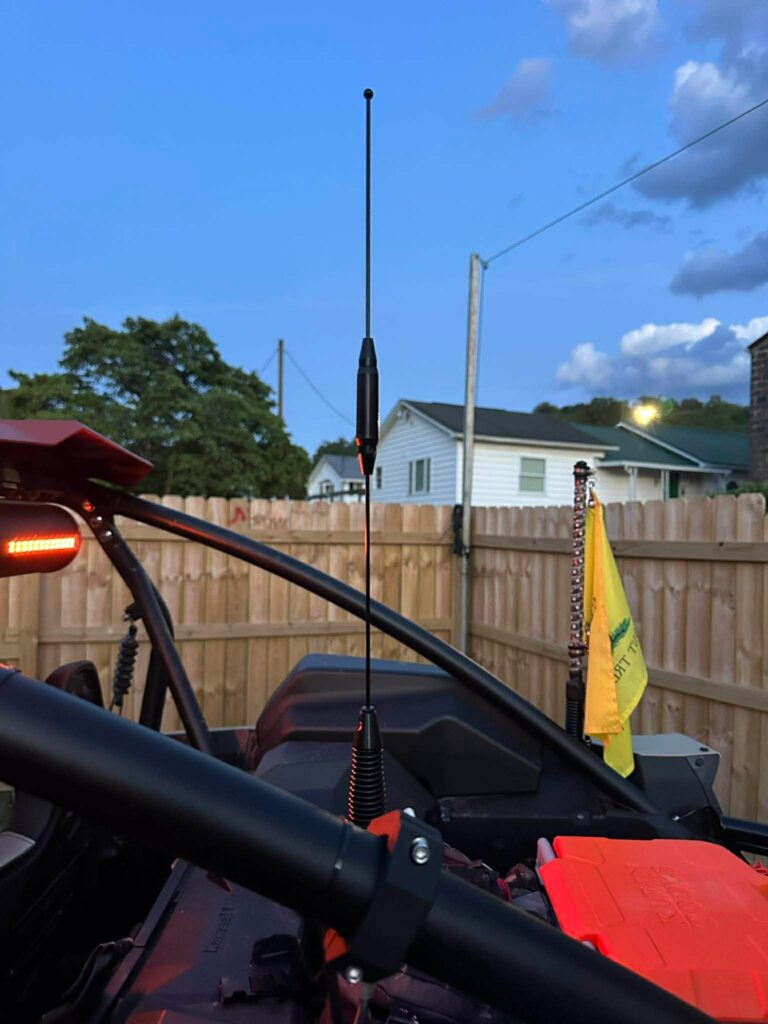
I recently purchased a new Kawasaki KRX 1000 Side-by-Side and added a mobile 2m/70cm radio to it. I had ideas of placing an antenna on the rear roll cage, and the following is what I came up with.
I used a whip light mount on the roll bar, ordered it thinking I could drill out the hole for the whip light and use an NMO mount. I found an NMO to SO connector on Amazon, along with a new TRAM 150Mhz/440Mhz/800Mhz tri band NMO antenna, and the mount.
I drilled the mount out to match the 5/8″ of the NMO connector. Went together rather easily.
I was able to use my nanoVNA and get less than a 2.0VSWR on 146.52 and less than a 1.5 on 442.55. Better antennas may do a better job on getting the VSWR down, but this is for off-roading, so I didn’t want to spend a lot of money on an antenna that’s likely to get destroyed.
Here’s some pics.
The radio is a cheap Baofeng mobile I found at a yard sale – if it gets water damaged, I am out $20. I added the radio bracket to a custom cut piece of kydex, matched up the 6 mounting holes in the roof, and bob’s your uncle.
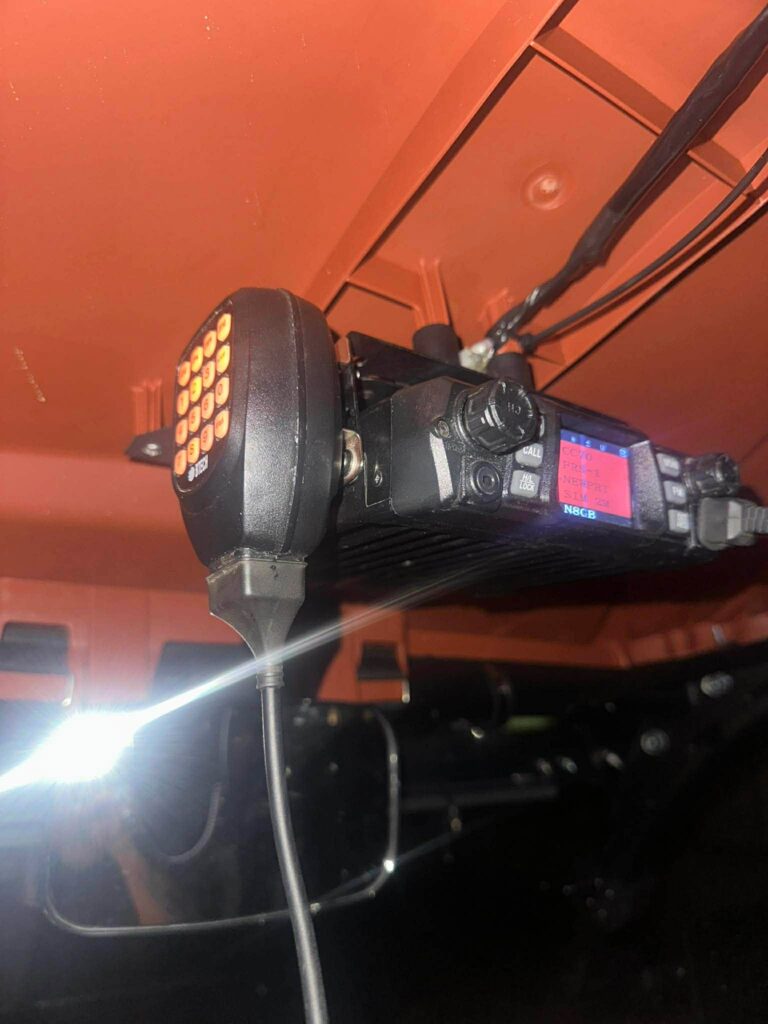
I added the kydex as reinforcement for the bracket. The bracket is bolted to the kydex and through the front of the kydex to the mounting holes toward the rear of the roof (2 holes) and the kydex is mounted to the front of the roof with 4 holes.
All in cost: $84 +/-
Parts:
Baofeng Radio (yard sale), $20
Antenna, $28 – https://www.amazon.com/dp/B0FBT62GYG?ref=ppx_yo2ov_dt_b_fed_asin_title
NMO Mount Connector, $17 – https://www.amazon.com/dp/B0D2MDMHGP?ref=ppx_yo2ov_dt_b_fed_asin_title
Pair of Whip Light Mounts, $19 – https://www.amazon.com/dp/B0DNHBPQYP?ref=ppx_yo2ov_dt_b_fed_asin_title
- PROJECT: Travel Case
CQ CQ CQ N8GB/Portable Calling CQ and Listening!
First Operation.

WV0CQ (now N8GB) Operating Portable from the High School Football Field
Field operations, portable operations, “bugging out”, Field Day, whatever you want to call it, is a huge amount of fun. Over the last few years, I have thoroughly enjoyed ARRL Field Day and out little mini-expeditions within WV. We throw just about anything you can think of into our vehicles and go operate portable for 24 hours. Over these few years, I’ve been honing down my equipment list and practicing my techniques, including on-air ops, as well as equipment setup. Of course, I am a huge fan of the Yaesu 857d radio. There may be others out there just like it from different manufacturers, however, I was imprinted with “Yaesu” early on during my enlistment in the U.S. Navy. So, I’ve kinda hung with it over the years.
A couple of years ago, a friend, KD8VYO – Roy, loaned me his “Super Antenna” to take and use while I went on vacation. I had researched this antenna prior to leaving and wanted to buy one, but I didn’t want to spend the money at that time. Roy however, took my research, did his own and went ahead and made the purchase. So, I took it with me to /p4 land and used it a few times from Alabama. I was hooked. It’s so easy to setup, when broken down, it’s compact and very portable. I knew I had to have one. Well, this month marks my 11th year anniversary of being married to one of the most awesome ladies I’ve ever known. I guess she’s finally embraced my Amateur Radio habit and since the 11th Anniversary’s “traditional” gift is “steel” and there’s some “steel” in the Super Antenna, I was fortunate enough that she ordered one for me.
Last night, July 11 2018, I took the below mentioned portable rig in the yellow case, along with the Super Antenna and setup portable at the local high school. I used the stands at the football field to mount the antenna. I figured the giant piece of aluminum would make an excellent ground-plane. I wasn’t let down. I made 23 contacts in less than one hour, even working a slight pile-up for a period of time. The adjacent baseball field lights were turned on for a late evening game, so they began producing an enormous amount of noise, otherwise, I would have stuck around until my battery died in my rig. I made contacts in Canada and throughout the mid-west, along with North Carolina, and several New England States. It worked like a charm. Took less than 10 mins to deploy and after carefully aligning the SWR ruler to the antenna, I had a good match the very first time I set it up. I had a great evening operating radio in the field and it only took about 1.5 hours from start to finish to talk up and down the eastern sea board.
I am planning on going on vacation back to /p4 land soon. When I do, the portable rig with the Super Antenna will be going with me. I’ll try to work a little radio each day, when doing so doesn’t conflict with my primary mission, which is to catch as many fish as possible. There’s a good chance that I may have the opportunity to operate /mm as well, as a friend is bringing his boat to meet up with me for a couple of days. If I have the opportunity, I can guarantee you, I’ll be operating radio from the Gulf of Mexico.
The Build.
I love the concept of operating portable. Once you’re setup and ready to roll, it’s not really difficult. Getting setup where you have everything you need and want, in a compact and portable rig, is the project, the fun and it’s a great hobby-within-a-hobby.
Some call these “go cases”. I prefer “portable case” because I actually go out and use mine. I use it throughout the year, including field day. We used my previous case on our Spruce Knob Mini Expedition. This new case, I hope, will make life just a tad easier.
In my Archived Projects, please refer to the “Exoskeleton Case” and the military communications case. While this “worked”, it was heavy. The shoulder strap, if you hiked for any length of time, cut into your shoulder. The equipment was of course, not seriously heavy, but it was heavy enough to let you know it was there. Also, when traveling through airports and passing through security, it wasn’t the greatest idea in the world to be carrying a military style equipment bag loaded with electronics. (LOL?) I was able to obtain a free reach-around from TSA and a full body pat-down. I didn’t get a body cavity search, but I was of course willing to try. At any rate, I decided that what I needed was something less-than-military, rugged, with wheels.
So, I found an “equipment case”, standard “carry on” size, with wheels and a telescoping tote handle. I didn’t need it to be padded. I thought about getting something in standard black, but I also wanted to make sure I could see it for various reasons, at distance. So, I chose the Seahorse Protective Equipment Cases SE830 Carry On Case in High Visibility Yellow. This is a standard color for engineering equipment, so I don’t believe it will raise eyebrows based entirely on the color. I will be able to see this case from distance, probably for miles in open areas. It is somewhat water resistant, but I knew that I would need to circumvent this resistance to pass through cables and/or mount the bracketing.

Seahorse Protective Equipment Cases SE830 Carry On Case
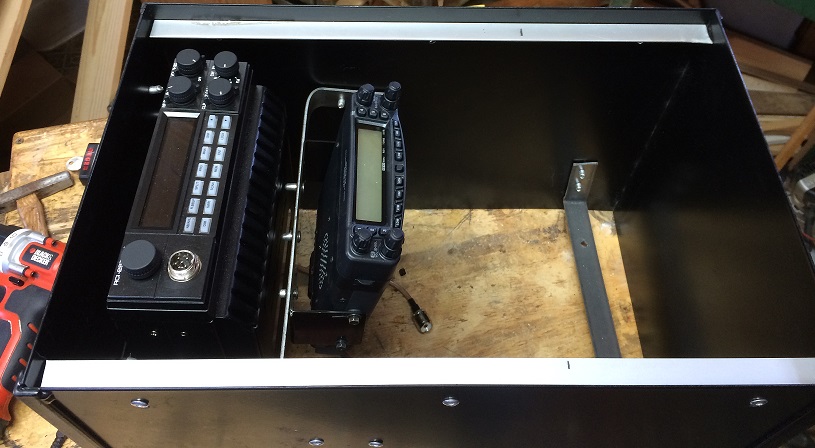
As you can see from these first three images, this case is just the right size for my purposes, which are to house my FT857d, a LDG Tuner and a LiFEPO battery.

One of my secondary objectives, for the time being, was for the case to be capable of fitting in the same space of my truck that I currently keep the 857d and the tuner, directly behind the center-console of the truck, behind the seat. I didn’t measure the space, I just assumed it would fit because there’s ample room in that area and I was right….

All that’s left is to put in a pass-through rubber grommet for the cabling. I’ll get to that later today.
Now, for the build.
I purchased the unit about 2 months ago and I finally got around to doing the build this weekend. All-in-all, I have about 3-4 hours of work in this build. I used aluminum 1/2″ angle (1/16th thick), aluminum 1/2″ flat bar (1/16th thick) and rivets (5/16th and 1/8th) to put everything together.
Luckily, once I opened up the case for the first time, I found 8 reinforced mounting holes in the bottom. These were precut 5/16th holes. I immediately knew that this would work perfect for the idea I was running through my brain. I wanted to bracket the bottom with track (angle), then make separate bracket for the radio and tuner that could “move” in some sort of fashion. My tracking the bottom, I could easily add axles and mounting holes for the radio bracket, which is what I’ve done. Here’s the bottom tracking, before adding anything else to it:

Surprisingly, and luckily I suppose, the distance between the bottom angle and the inside wall of the case was absolutely PERFECT for the battery area.

Now, I built a sturdy bracket to mount the radio and tuner within. I added slots in the bottom end to use with the axles for rotation upwards. This will allow me to rotate the radio up and out of the case, to see the front panel easily when I am operating portable.


Radio/Tuner Bracket
I cut the hole for the axle with a drill, then used a Dremel Tool to cut the slot. One this was complete, some minor fitting and then I inserted it into the case, for fitting of the upper “keeper” screws (see below).


After Fitting
Once fitted, and I should have mentioned this previously, I used the excess upper bracket material on the bottom of the radio bracket to secure the unit in place by drilling a hole on each side, putting machine screws up through the case bracket, securing that with nuts to the case bracket, through the holes on the radio bracket and then securing the radio down to these machine screws. This will be easily removed so that I can elevate the radio and tuner at an angle suitable for operation while the radio remains in the case (See below).

Here’s the battery case bracketing. There’s only two holes in this case, one for the the battery case and another I will be adding this evening for the cable pass-through. I will put a rubber grommet in place for the cable pass-through. I placed a single machine screw through the case to allow easy changing of the battery. I sealed the screw with silicone.

One might mention the aluminum bar between the positive and negative posts on the battery. The battery has protective plastic pieces that slip over the connectors. Also, because of the way the bracket is position, you can’t turn the battery to get it in position to touch both posts of the battery to the bar at the same time.
Here is the rig in an elevated position. I haven’t yet decided on what I will be using the keep the unit elevated. I stuck a scrap piece of angle under the radio bracket to keep it in this position. I’ve thought of a couple of ways of doing this permanently, I just haven’t decided which way I am going to go at this time.

This evening, I will be adding the hole and grommet for the cable pass-through and making my decision on what I will be doing to keep the radio at-angle. Otherwise, it’s finished and ready to roll, literally and figuratively 🙂

Tape Measure Antenna
I will be able to throw in a couple of wire antennas, baluns and my new tape measure antenna along with some rudimentary tools necessary in our way of life. In the meantime, this will be stored in the truck, for daily use.
73!
N8GB
- Archived Projects
Archived Projects (of one type or another)
Here, we find some of my old projects. Some of these projects didn’t work out as well as anticipated (to be expected). So, we learn and we rebuild to suit our need. I’ve archived all of these projects in one post. In the future, individual projects will each have their own posts and I will put them on one page, in chronological order.
Exoskeleton Cage for the 857D.
On the way to the cabin, I stopped by a gun show and found a really nice, padded, “military” style radio case/bag. It’s new, padded, has an external pouch for a battery and internal space for coiled di-poles, plus the radio/tuner of course. It’s PERFECT for the 857D, a tuner, dipoles, battery, and a few other accessories. So, I decided to put the 857D in an “exoskeleton” with enough room to mount an
LDG YT-100 auto tunerLDG AT200 Auto Tuner. Here are the pics, from start to (almost) finished.
“Transit” case

“Transit” case

“Transit” case with the ICOM in it, heading to the cabin

Mounted, glued, painted (another angle)

Mounted, glued, painted

More fitting, ready to glue

“In the Bag”

Fitting the Radio

Fitting the Radio
By putting the 857d in the skeleton, I can easily take it out of the truck, while maintaining some protection in the truck. Behind the seats in my regular cab pickup, there’s a nice area that I’ve been keeping the radio within, however, I did not “mount” the radio, because I wanted to easily take it out and use it portable. Now, with the skeleton, it will be protected on all sides, plus the skeleton fits down into the new “radio bag” perfectly.
I’ll be adding a YT-100 Tuner later.As for now, it’s back in the truck and operating perfectly.Update on the cage: I finished the cage a few days prior to the Charleston Area HamFest. I always go to the Fest and this year was no different. I had absolutely no plans what-so-ever to spend any major amount of money. I figured I would purchase some adapters or little things like that and be done with it. Not so fast! Along came an LDG AT200 tuner. I was going with a YT-100, but the AT200 is a better tuner and it was priced to move! $100 for a $259 auto tuner. So, I went ahead and spent the money.
After getting home, I figured I would need to modify the cage to accept the width of the AT200, and I did. Here’s some of the pics, you’ll notice some added piping and the widening of the cage. After adding the width, I sanded and repainted the additions.


Cabin Shack. I recently brought the Icom back from the cabin and allowed it to be used for Field Day. I need to do a little work on it, a couple of the lamps have went out on it. So, I am going to do those repairs and then take it back to the cabin, along with my TYT9800. Once there, I am going to work on getting it setup in a semi-permanent state for use at the cabin. I’ll be running an Eagle One vertical and a dual band 2m/70cm mobile antenna for now. Sometime this summer, I want to lay the groundwork for a tower and sort through my tower pieces and build something suitable for the cabin. I am not sure what antennas I intend to put on that tower at this time. I know a whitestick 2m/70cm antenna for sure, as for the HF antenna, I am looking at possibilities.
UPDATE: I purchased a G5RV Di-Pole antenna, I’ll be taking it up to the cabin on my next trip and installing it. Haven’t yet decided how I am going to do one end of the di-pole, but I suspect it will be on a canted pipe mast as I have several 10′ pieces of pipe that I can use for such a project. We’ll see.
I’ve decided to go with the G5RV at first, then add a HexBeam on the Cabin Tower. Will be taking out time on this one as our budget calls for a new Super Antenna to be purchased before the big trip to the Caribbean.
I said I wouldn’t go this route, but winning a $500 gift certificate with a local electronics outfit overruled that verdict. By winning the certificate, I was enabled to get a mobile HF rig, in particular, a Yaesu FT857D, a screw driver antenna (Little Tarheel II), and a Breedlove ball mount (highly recommended!).
 The 857D, if you didn’t know, is a versatile little beast in a small package. You should check out the specs on it sometime, it’s impressive in what all it offers, including the expansion capabilities. The Little Tarheel II, while it is a “screw driver” antenna, doesn’t take up nearly as much room as other screw drivers, and it performs well enough for me from (so far) 15m – 80m (haven’t been using it when 10/12m have been open).
I replaced the FT8900R in the Zombie Apocalypse “Babe, the Big Blue Truck” with the 857D. The 857 comes with 2 SO259 connectors, one for HF (through 6m) and one for VHF/UHF. I have programmed all of my favorite frequencies/repeaters into the rig, now with the push of a button, I can scan everything I listen to (HF, VHF or UHF!). I lost the ability to cross band repeat and thus far, I haven’t found a feature on the 857 that will allow simultaneous listening on two different bands (haven’t really looked into it that much, but I will soon). The LTII tunes very easily, albeit a bit slowly. There’s no “tuner” needed for this antenna. It will lengthen and shorten from 80m thru 6m, with little trouble, but with a little time. It takes a couple of minutes to go from 80m up to 6m. I usually keep it (in the picture shown) tuned to the middle of the 20m band. It takes a count to 45 (my speed) to go from 40m to 20m.
The final 2% I need to complete involves hiding the coax (shortening it as well), along with properly mounting the 857D behind the center seat section.I am going to leave just enough length on the coax to install a CB radio when I decide to sell the truck, that way, I can leave the Breedlove mount in place, rather than simply removing it. Whomever buys the truck will get one heck of an antenna mount in the deal, that’s for sure. I can’t say enough good things about the Breedlove mount, it’s the cat’s meow for sure. It’s machined from solid brass and the plates are machined aluminum. Everything about this mount is exceptional.Because I had the remote control cable for the 8900R already installed (same remote cable/plugs as the 857), the external speaker was of course there and already being used by the 8900R, and because the power I pulled through the firewall was large enough (8ga.) to handle the upgrade to a 100w HF rig, some of the install was already accomplished. Therefore, the major task in installing the 857 was the ball mount. All-in-all, the install took about 2.5 hours with the existing wiring in place. If I had to run the power cable and remote control cable, add another hour or so into the install.
Also note, I use a “Gear Keeper“, which is a retracting cable/cord for use with a variety of different things, in my case, I use it for my microphone. From my many years of using radios in vehicles, a “Gear Keeper” is one heck of an addition, especially for the $15 or so that you invest. I’ve attached my Gear Keeper to the passenger side hinge of the sun visor. It doesn’t get in the way of using the visor and attaches around the hand mic stud on the back of the mic. When I want it, it’s always in the same place, I use it, then let it go, the retracting cable pulls it back up and out of my way.

I have finished the install of a 40ft tower and the hexbeam on top. I dug out a 4″x24″x28″ piece of existing concrete, dug the hole deeper (24″x24″x28″) to anchor my base, used 3/8″ steel bars as hinges and anchor points and sunk 2 8′ copper ground rods.
I had an issue during raising the tower where two of the light-weight bungie cords that are used to hold the fiberglass elements in place, came loose. Not a big deal. These cords are primarily used to hold the fiberglass rods in place while you put the antenna together. As of right now, I have the feedline installed and I have tested it on all bands and it works just fine. In fact, I was able to contact Kuwait last night and Australia this morning on 20m.
I was able to get the top of the tower ready, including building a bracket for my rotator (thanks to Radio Shack closing in my area, I scored a major win on two rotators and a roof mount).
Here’s some pics of the tower base:


As you can see, the hinges are made from 3/8″ steel with a 90° turn at the bottom. Each piece is bent slightly different than the next so that they do not touch. Some are longer than others. Each of these are held in place by gravity for the pouring of the concrete while the 8′ copper ground rods are in the ground below the 24″ bottom of the hole.
It took 13 bags of concrete to fill that hole which amounts to over 1040lbs of concrete. The tower weighs appx. 25 pounds per section, 4 sections, 10′ each or 100lbs. The Hex is about 25lbs and the rotator is about 10lbs, so we’re looking at less than 150lbs mounted to a 1040lb anchor, sunk in the earth between two buildings, which is down in a valley behind multiple hills. I don’t think I’ll ever have a problem with the wind.
 I am working on getting the cabling and antennas in place at my Cabin. I have a backup rig that I take back and forth with me, in case I want to get on the air while I am there. This will be installed in a military surplus communications shelter that I acquired in 2015.
To the left, you can see the original form of the military surplus box. To the right, I added some “cabin” touches to the box. I painted it to match the metal work of the cabin and did the “X” on the front to simulate a “barn”. On the side, when finished, it will have the “Mail Pouch” advertisement on it. A neat little addition to the cabin.

Another on-going project I am working on and probably will continue to work on in my spare time is the
Radio Communications in a Dire Emergency – v. 1.0
Understanding the Possibilities and Limitations of Radio Communications WHEN ALL ELSE FAILS
© 2016 John Holstein, WV0CQ, Systems Administrator/Web Developer – All Rights Reserved
I have been developing a “worst case scenario” approach to radio comms. Or perhaps better referred to as a “SHTF Comm Guide”; something that I developed for our club’s use in the event of a major disaster. This portion of my work will be included in the final document. At this point, I am about 2 Chapters into the document/work/book. This document hopes to illuminate some rudimentary functions of radio comms and place an emphasis on “outside the box” type voice comms. Mostly aimed at the uninitiated radio operator, it will have more advanced elements for current licensed amateur radio operators as well.
Previous projects:
- Through the Coal Country Amateur Radio Club, we put a repeater site up for the Boone County Firefighter’s Mutual Aid Association. Many CCARC members are also members of the Assn. Here’s the Projects Page for CCARC.
- I completed my boom-microphone project. I built an adapter for the Yaesu so I can plug in 1/4″ mono plug microphones (or adapted from XLR mics) to the Yaesu. I am also building from scratch a handheld or mountable PTT key in a 2″x1.5″x1″ project box. I’ll update this with pics later.
- K4HEX HexBeam antenna. Overall, from the time I cracked open the boxes until I had it together an on a 10′ mast pole, it took about 2.5 hours, by myself. I spoke with NA4RR – Roger Rockwell briefly on the phone and I must tell you, they have an awesome product with amazing support. I highly recommend this antenna. I am getting good results; somewhere in the neighborhood of +3/5 of S meter rx signal and a +2/4 tx boost. It tested out fine with the antenna analyzer and I was able to plug it up and work 6, 10, 12, 15, 17 and 20 without a tuner. I am in the process of modifying an existing design of a tilt-mast and I plan to build it to suit my needs and put the hexbeam up about 35′. Not exactly high enough, but I am limited in what I can do at my location. Item #1 at the top is the final part of getting the Hex on a tower.
Obtaining a dual band 2m/70cm radio.Just purchased and installed a Quad Band Yaesu 8900R into the Ram 1500,waiting on the Diamond 8900 antenna and lip mount, then we’ll be good to go!.Installed a Diamond 8900 quad band antenna (specially designed by Diamond for use with the 8900R) on a k600 Diamond mount. I didn’t have enough angled spacer washers to get just the right angle on the 1500 that I wanted. I mounted the antenna on the hood, drivers side rear corner. The angle on the hood was just slightly out of reach of the two supplied spacers. I made an ad-hoc spacer out of a large washer at install. In the meantime, I called the folks at Diamond Antenna. The person was extremely helpful in providing me with an additional angled spacer, no charge! I highly recommend these folks for their customer service. The antenna is doing really well. I can hit all of the repeaters in our area with no problem. It’s a hot little antenna that has great reception and transmission. The number for the folks at Diamond antenna is 770-614-7443
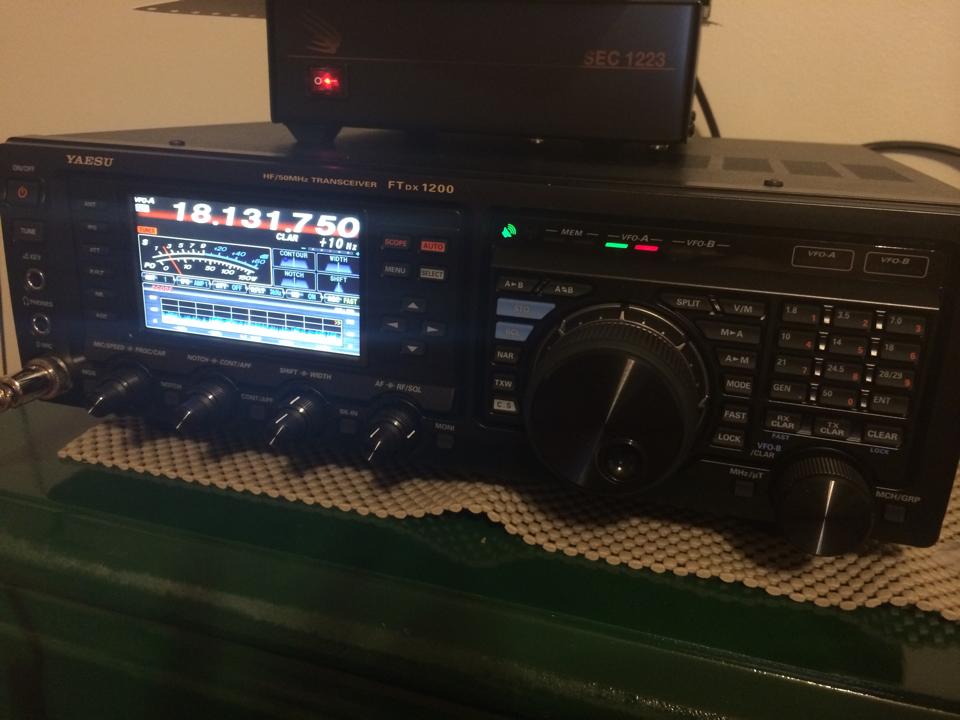
Obtaining a base station HF rig. Delayed until fall/winter of 2014.Well, that went a little more quickly than expected.- May 2014 – Obtained an ICOM 725 and the MFJ Antenna Tuner from KB8GLY. I didn’t have a proper power supply for this rig, so transmission was out, but I was able to get a di-pole installed and was up and listening the evening I obtained the rig. I am going to utilize this rig until I am able to purchase the Yaesu 1200, which should be in the next couple of weeks.
- 11 June 2014 – Finally obtained the Yaesu FTdx1200 rig. Got it up and running on the Eagle One vertical antenna. After initial setup, found that even with the MFJ Antenna Tuner I obtained for the ICOM 725, I was still only able to tune 17m and 6m below a 3:1 (going to be working on that soon). After getting 17m running, I was able to make several QSOs from Europe, Cuba and the U.S. I find that this type of radio operation, from the comfort of my own home, sitting in a high back “big boy” office chair will lead to many hours of lost sleep.
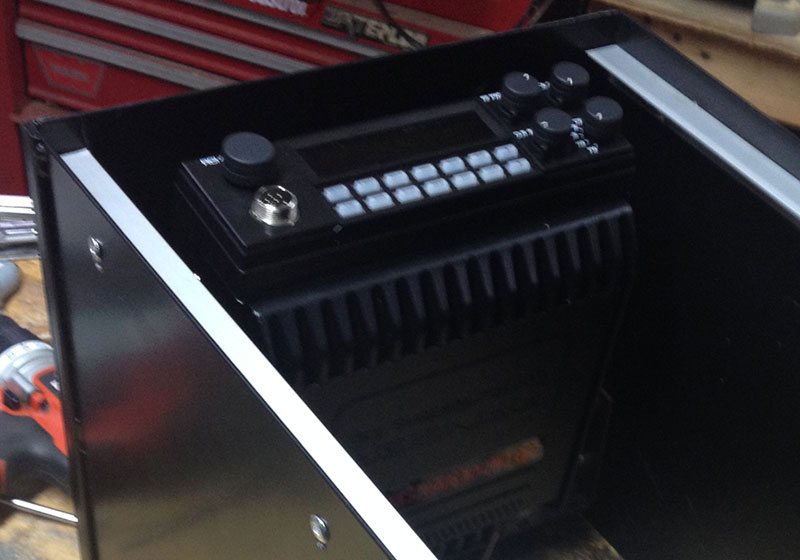
- Finishing the console for the truck. Installed the 8900R into the console, now to layout a faceplate and storage area. I’ll be taking the faceplate template to Burns Powder Coating for creation. Then, I’ll begin work on the arm rests. Decided to have Burns build the top first. I’ll be adding a plexiglass faceplate after the cover has arrived and adding the arm-rests to the top.
- After many months, the console is finished! I had Burns Powder Coating build the lid then I installed it by using a piano hinge. After installing the lid, I built a cushioned top and upholstered it with a piece of flannel I obtained from the local fabric store. I built the faceplate out of plexiglass, cut to fit and then painted flat-black. I installed pieces of black tubing that I had sliced down the center axis as trim pieces for the edges. All said and done, I have less than $100 or so in the console, much cheaper than going to Galls and purchasing one and it is a lot more roomy and sturdy than a pre-fabbed console.

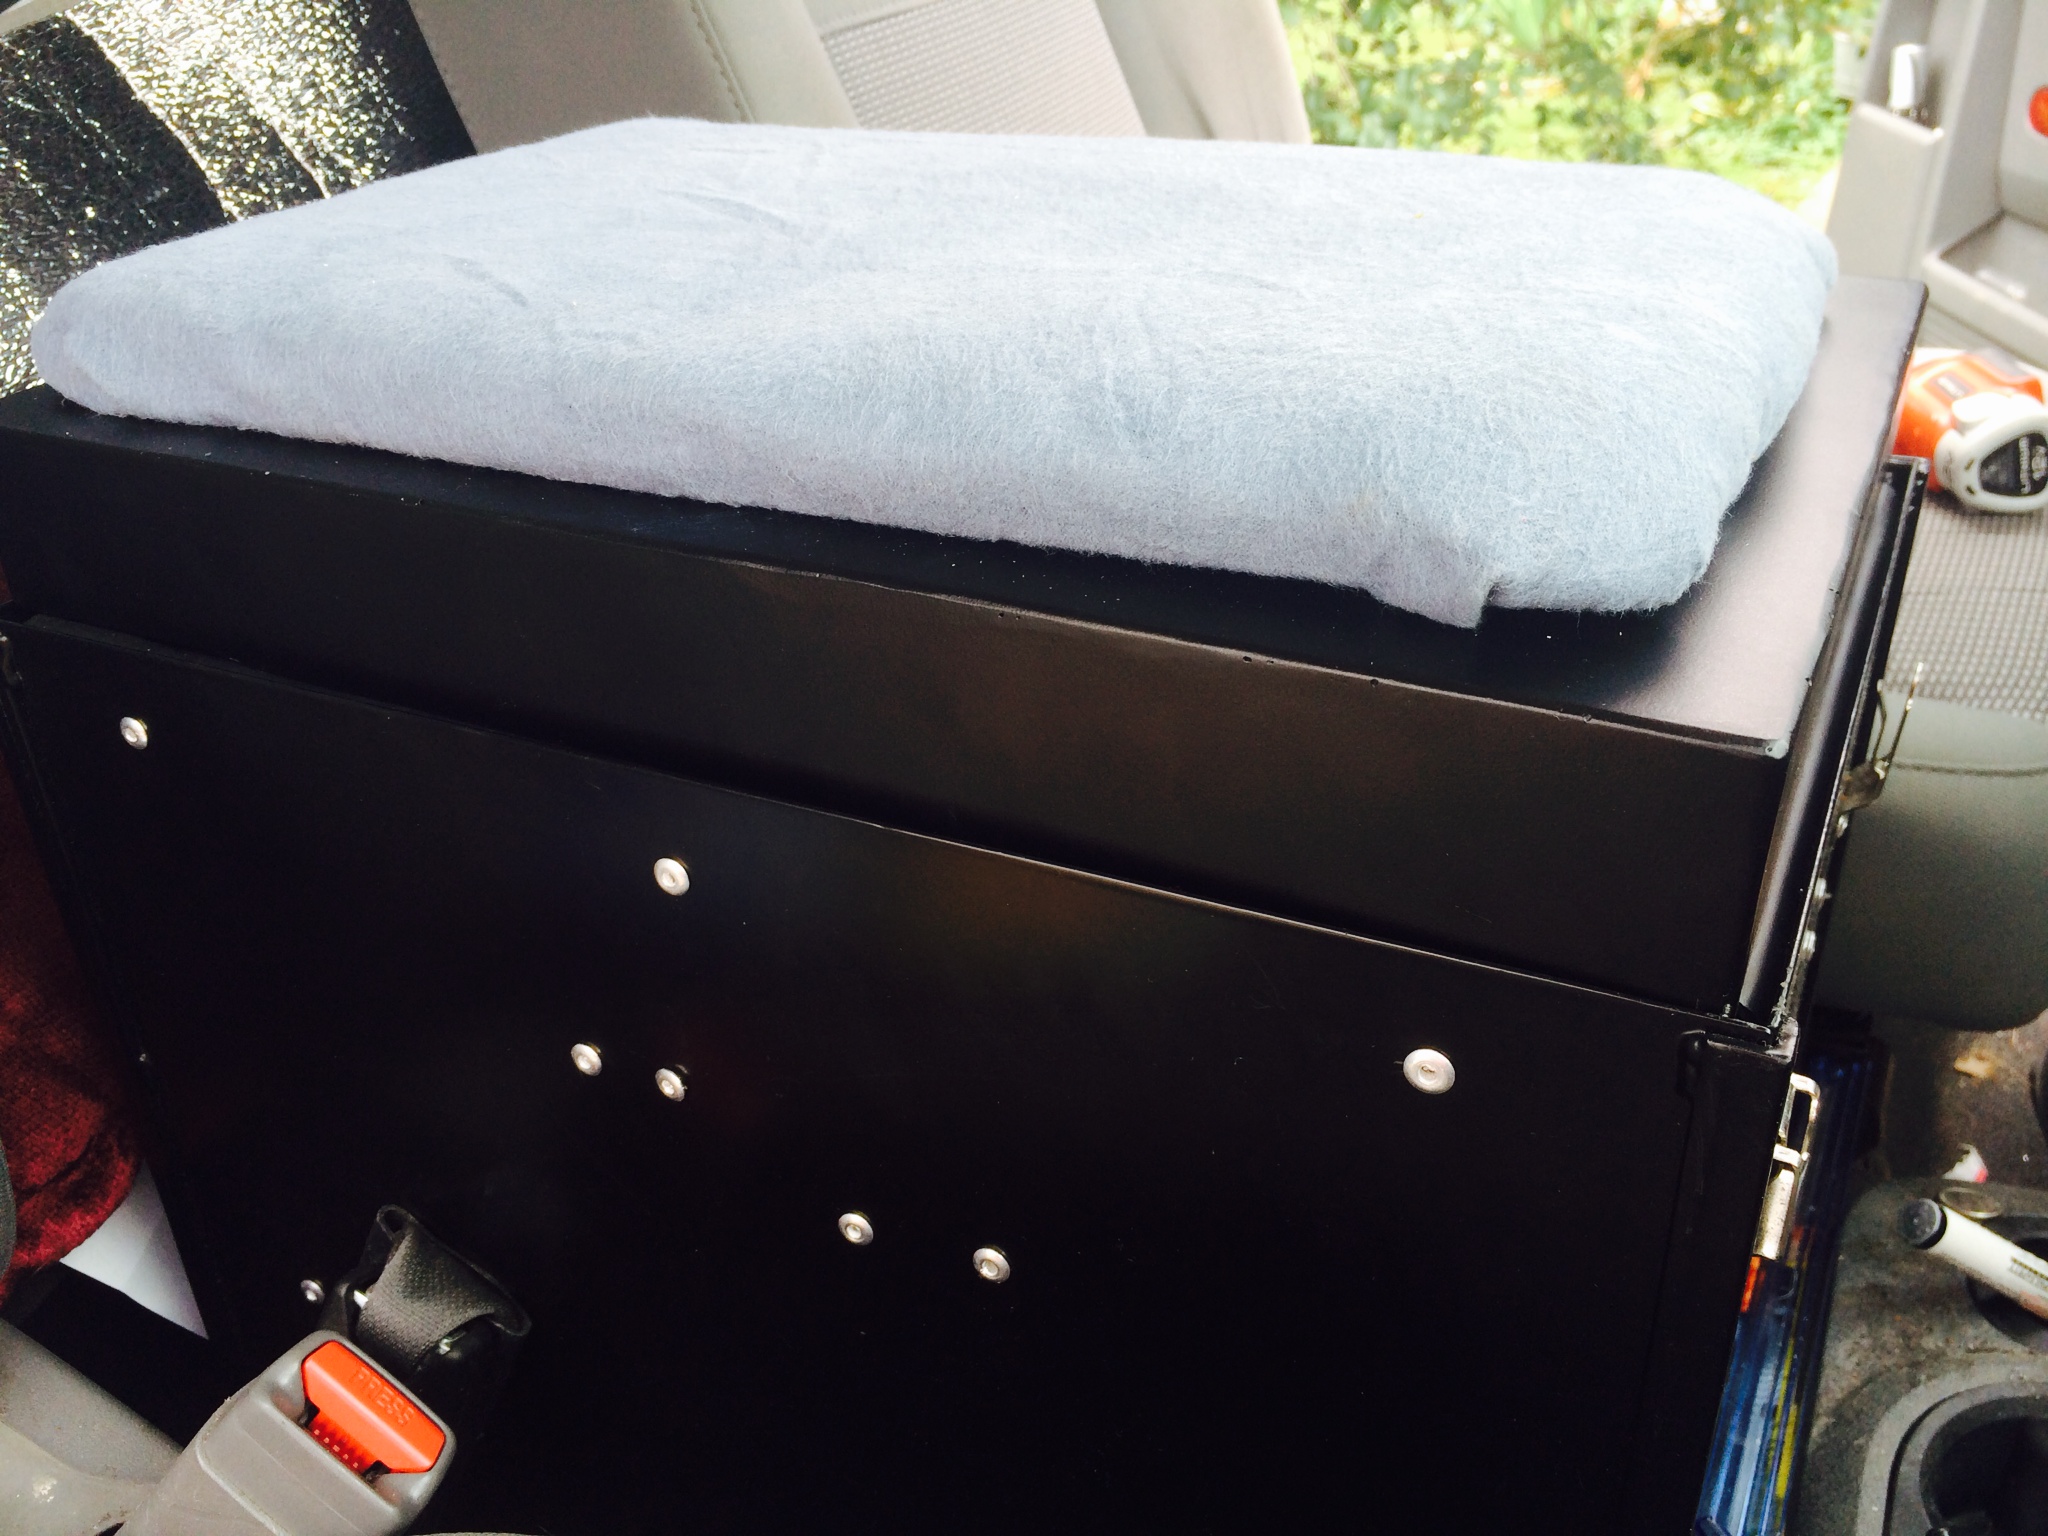
Console after adding RCI 2970
Here’s some pics of the console:
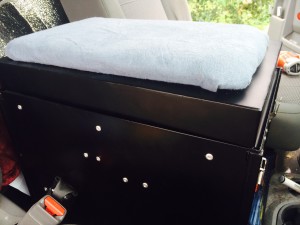
Console with padded top

Console after adding Yaesu 8900R and RCI 2970
Finished Console with padded top
Planning stages for a new shack desk.Shack desk is complete and installed!
- Develop a guide for obtaining HAM certification(s). Here’s my work in progress.
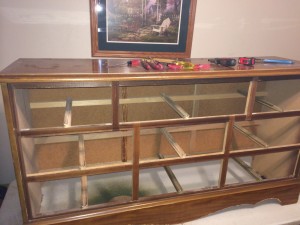
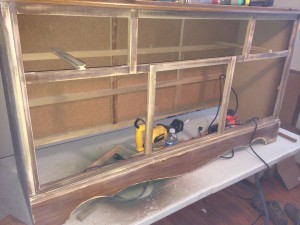
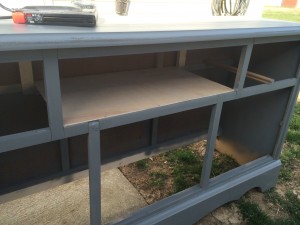
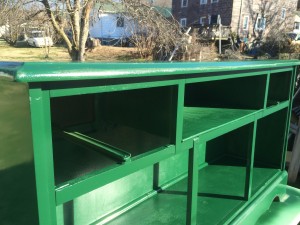
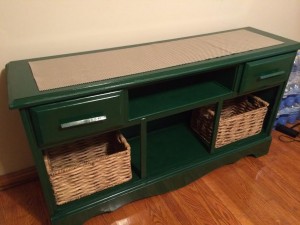
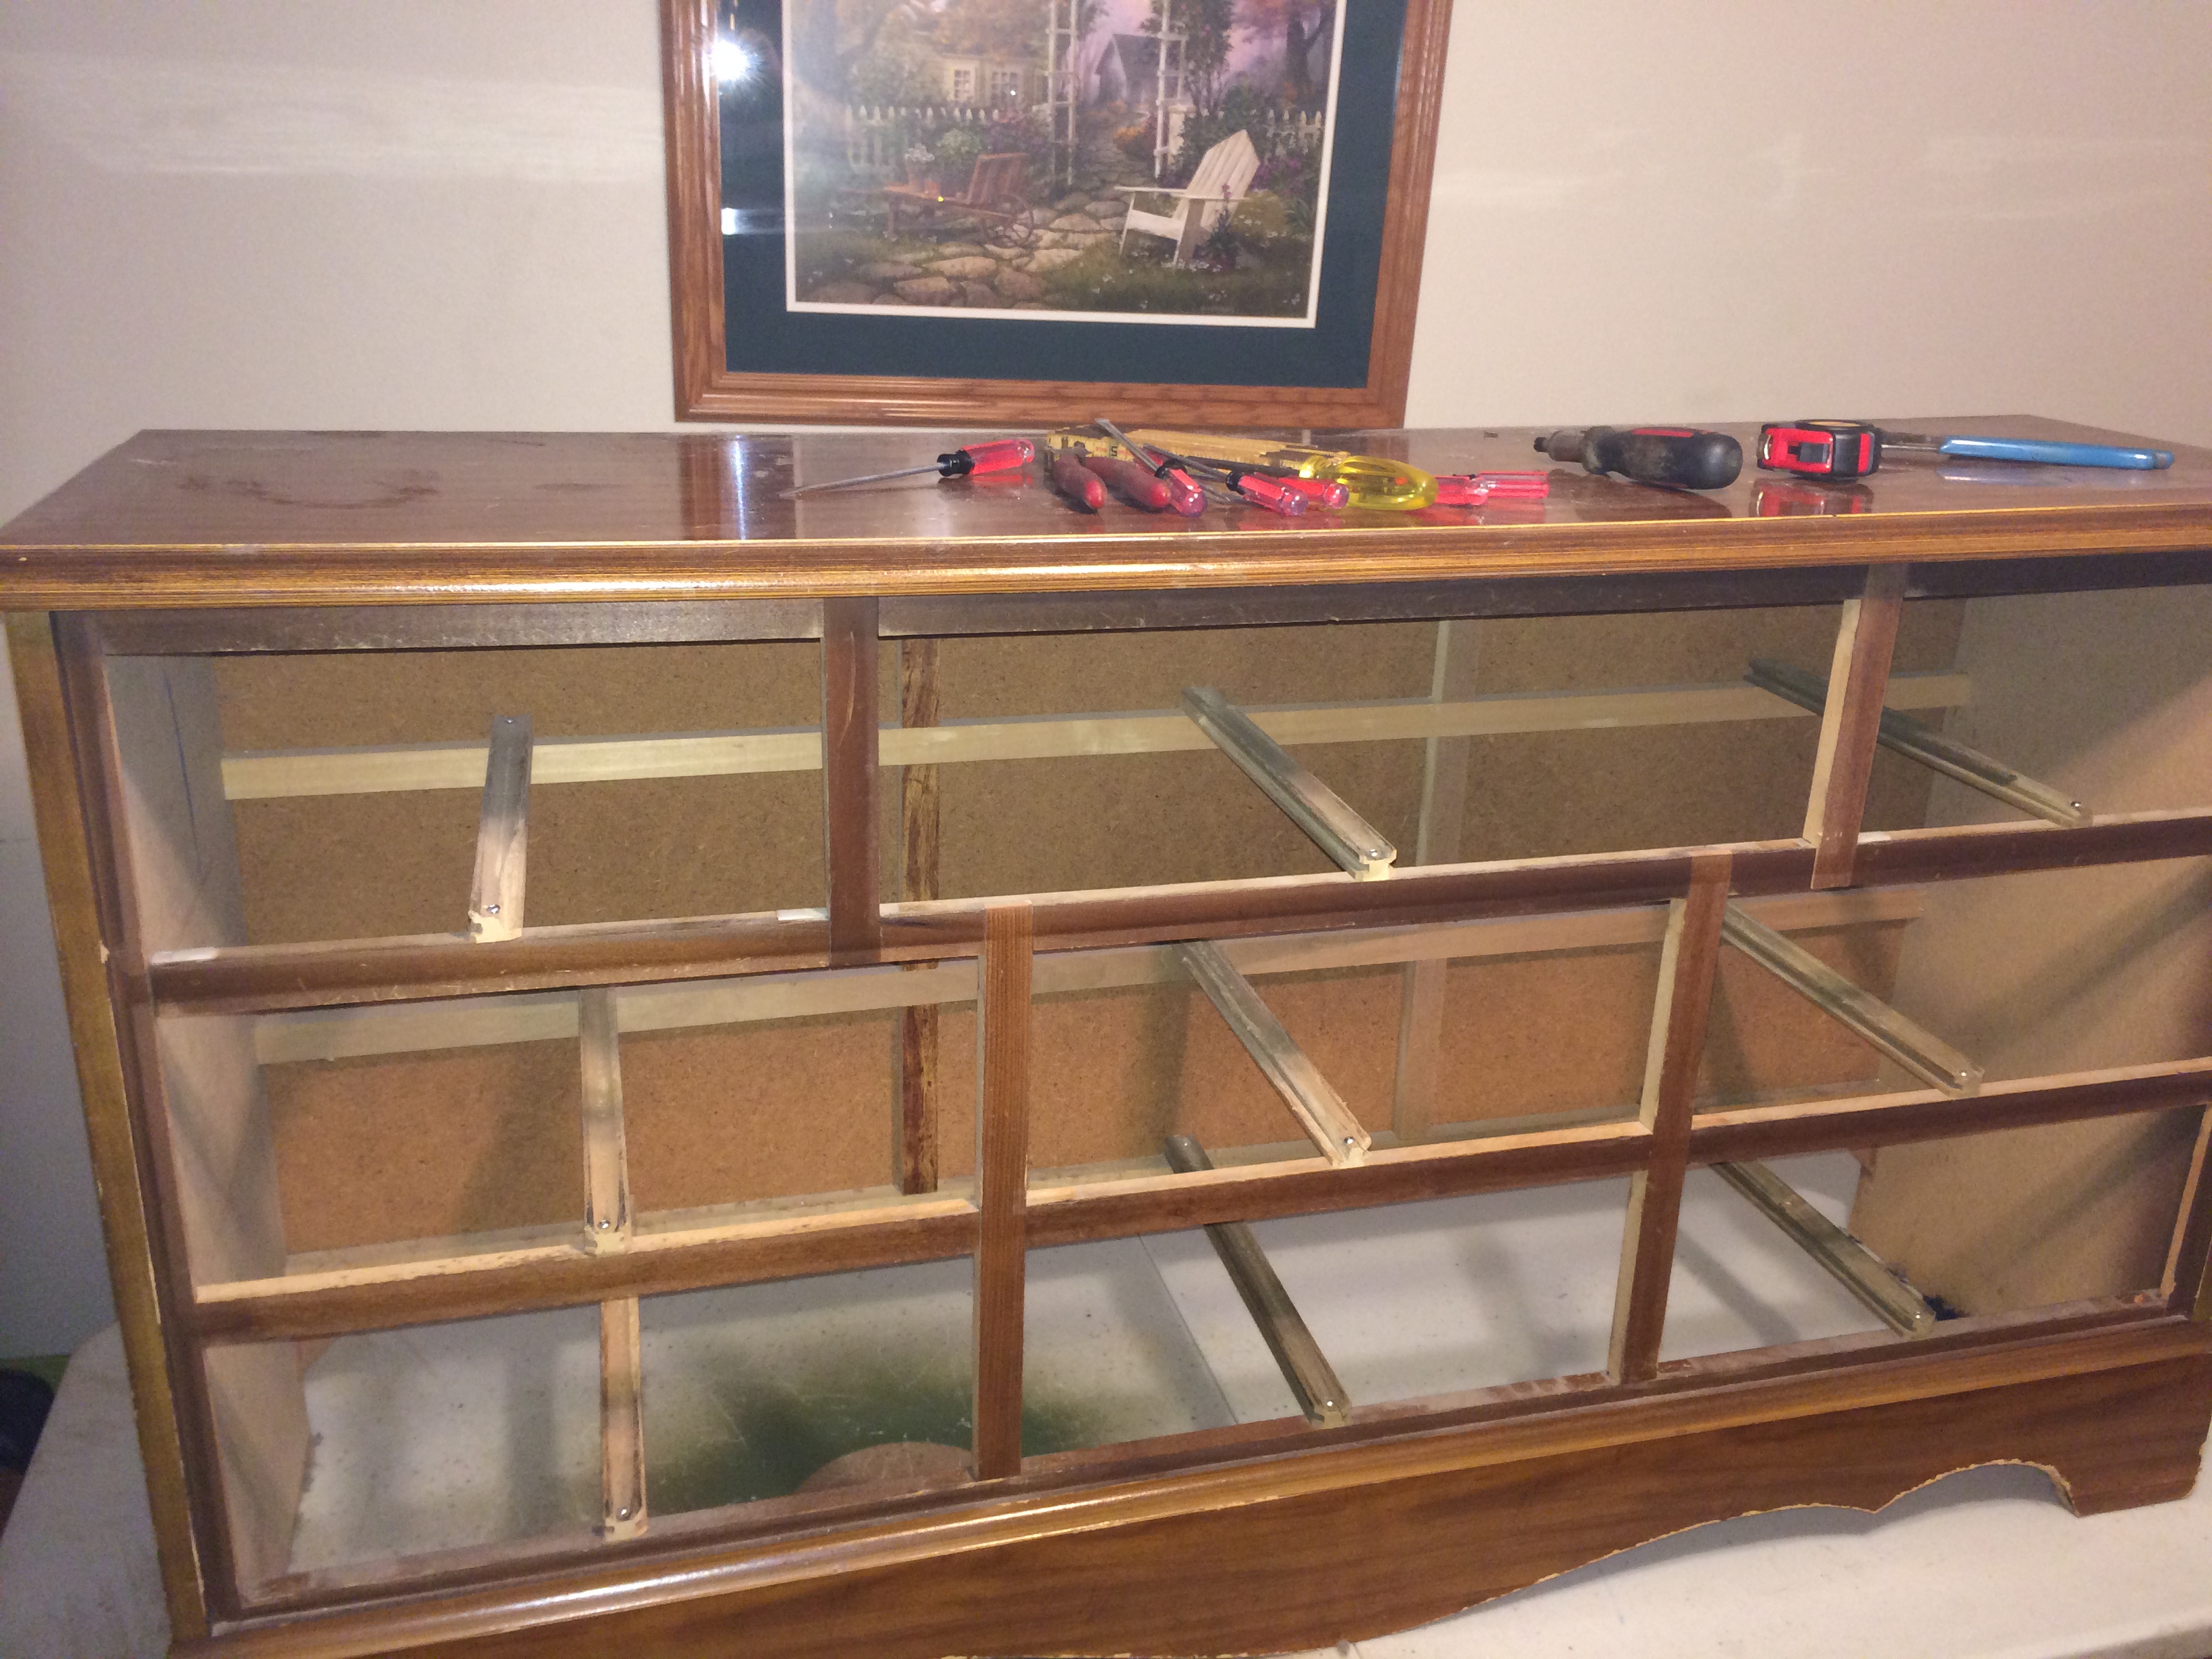
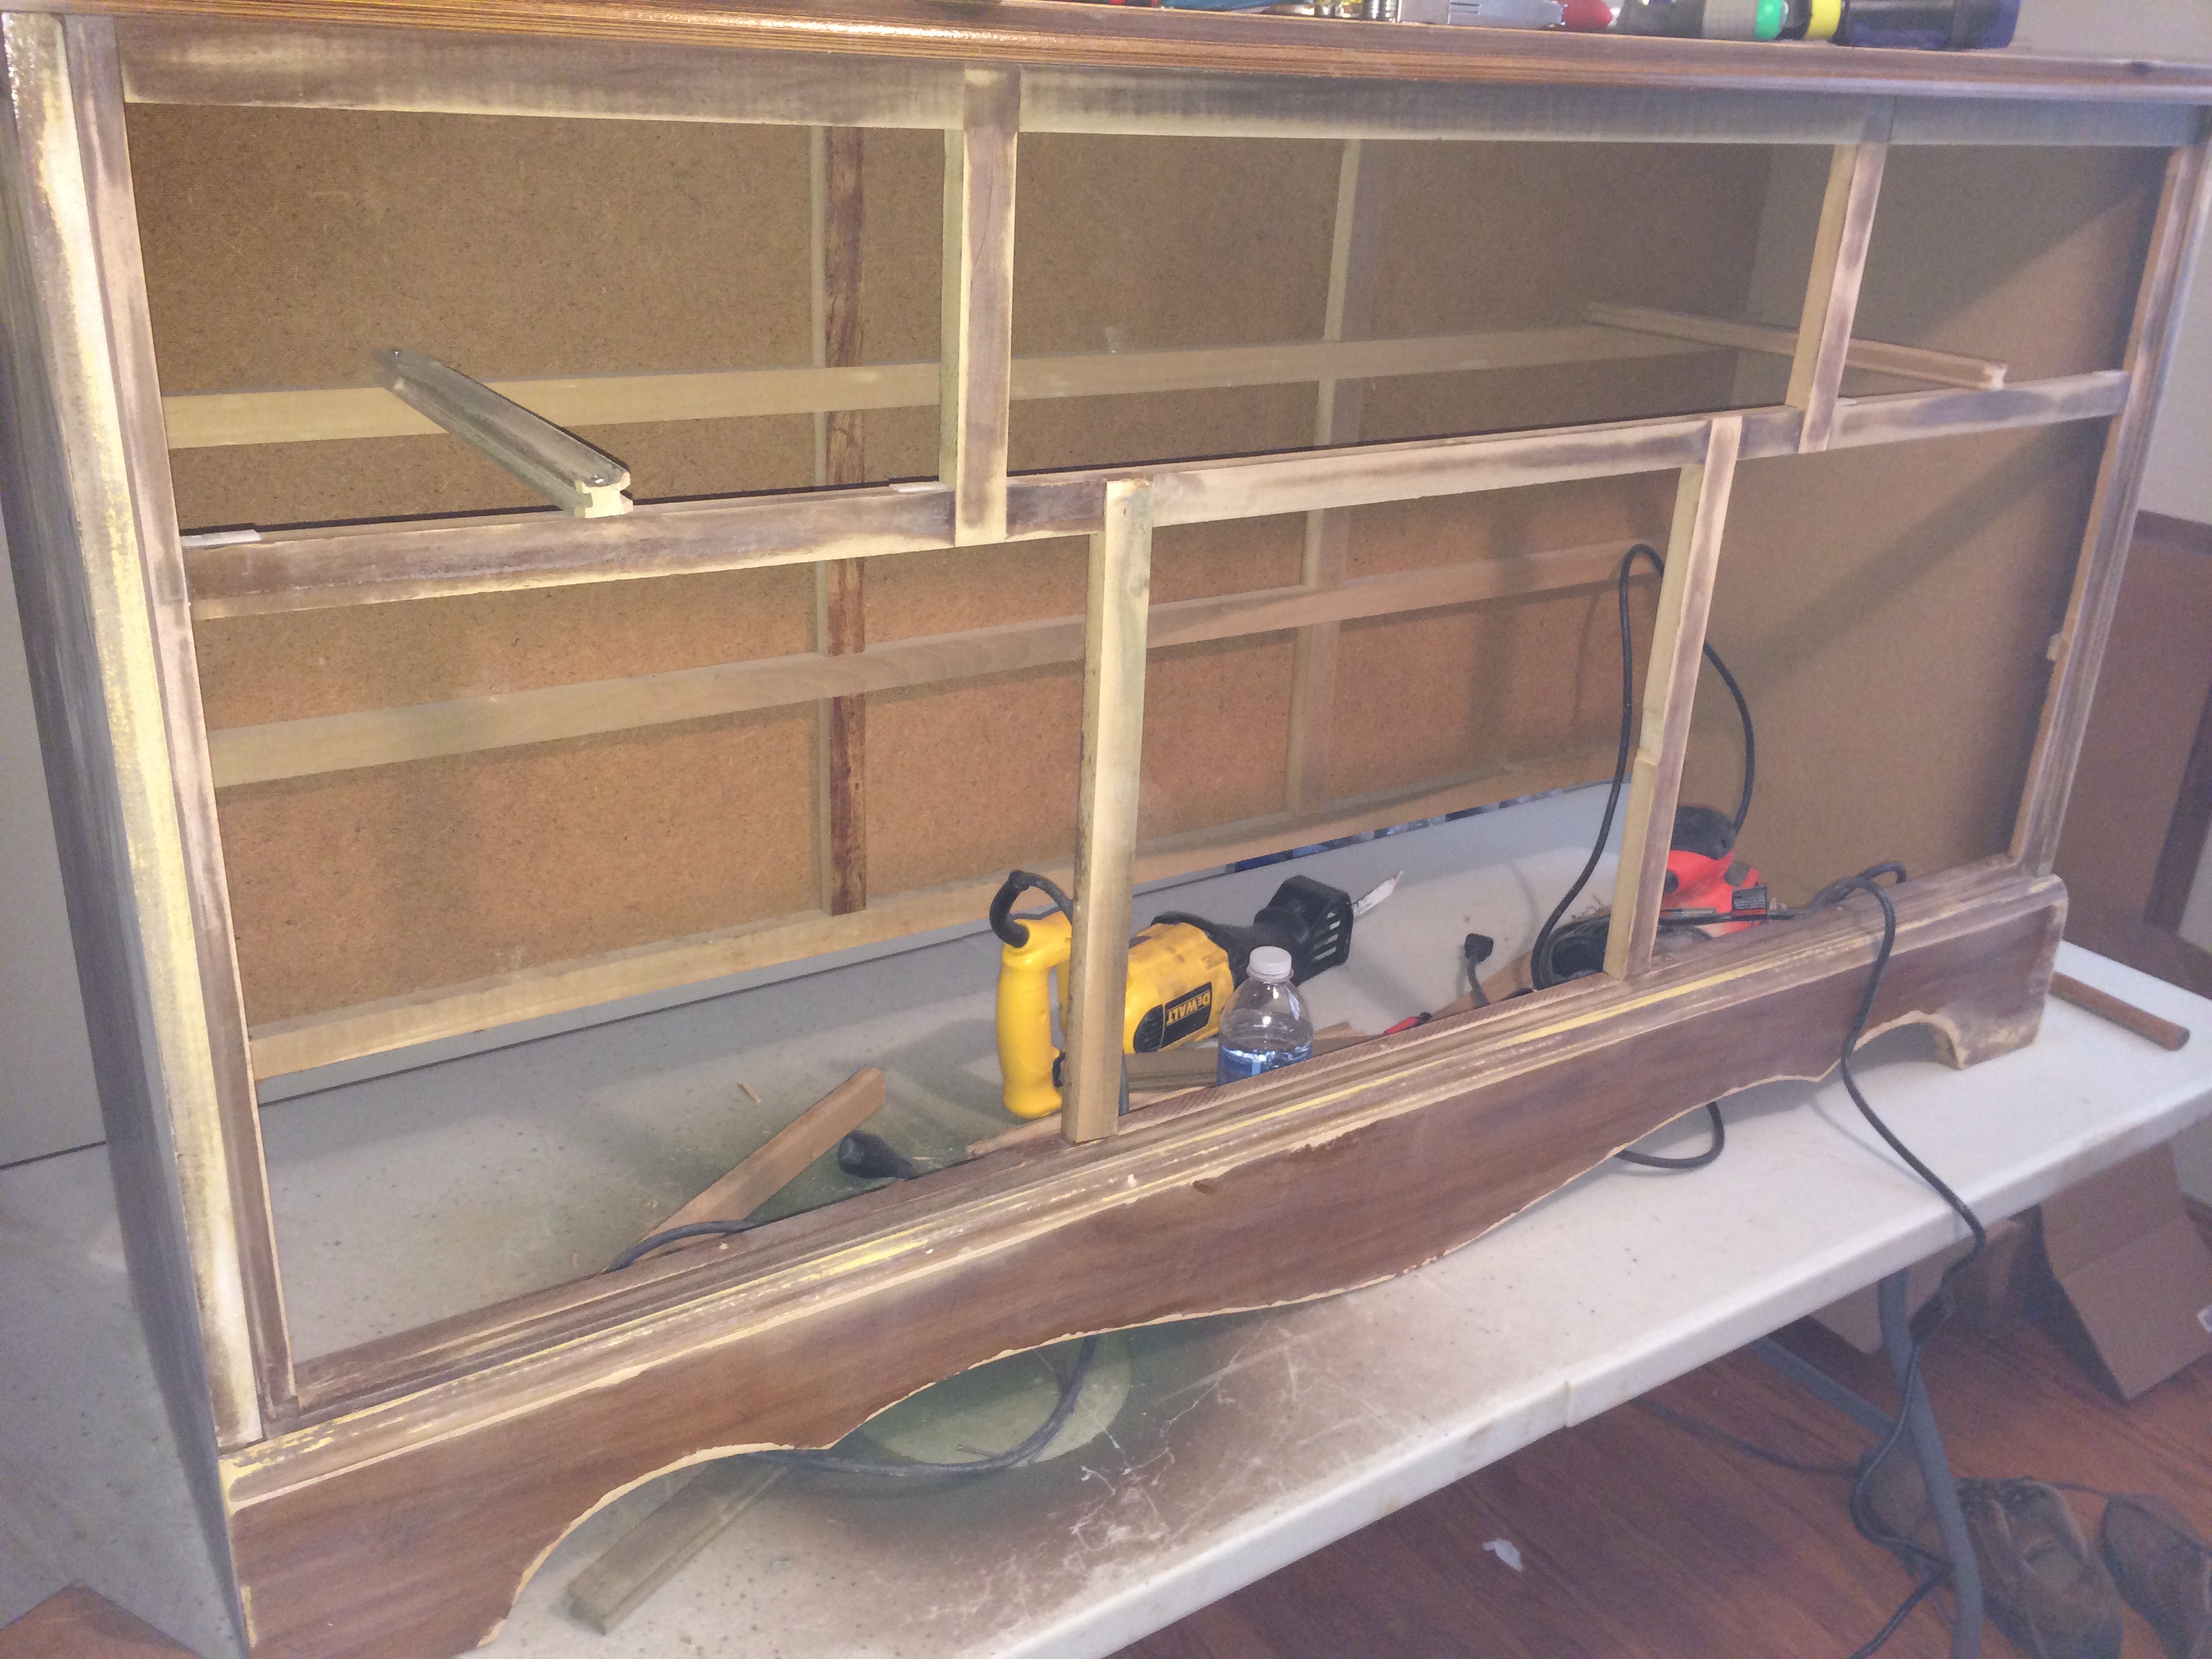
- Re-purposing a dresser for use in the shack.
Here’s some pics of the repurposing project: